
Unmasking the Secrets of Viruses
A discussion with Ella Kang on her work in virology.

Introduction
Recently, I had the privilege of talking with Ella Kang, a biomedical engineer working under Dr. Cameron, the chair of the Department of Microbiology and Immunology at the University of North Carolina at Chapel Hill.
During her time as an undergraduate, Ella’s major required her to take a broad range of topics, including physics, electrical engineering, chemistry, computer science, and statistics. The variety of topics that Ella studied gave her a unique skillset and the opportunity to explore various fields. As a result, Ella worked on a variety of different projects, ranging from work with CAR-T cells, nucleic acid detection, to even biosensors and bio-diagnostics. She went from using already established techniques to tackle a scientific problem, to creating her own techniques and seeing what their downstream application could be. While biomedical engineering is definitely an extremely challenging major, Ella really enjoyed the freedom in having the choice of either focusing more on engineering or biology while still having the skill set of the other.
Now, as a senior working under Dr. Cameron, Ella worked on a project centered around the intersection between biomedical engineering and virology specifically single-cell virology. The central goal of the project was to unmask the heterogeneity of viral infection kinetics. They investigated different cell lines and viral mutations and tried to find the key factor that would inhibit viral spread. The advantage of investigating virology on a single-cell level is that it provides the clarity and accuracy that bulk experiment does not provide. You are able to study the heterogeneity within a cell line and explore why certain cells react differently even though they are all supposed to have the same genetic makeup.
Experimental Workflow
The workflow for Ella’s single cell virology experiment was as follows:
Fabrication of microfluidic device on glass slide
In virology, the main technique used to study the progression of a viral infection is to seed a plate of cells (with hundreds of thousands or millions of cells) and add virus to them in order to see how the virus affects the cells. In order to study the cells, a device needs to be designed or fabricated to hold and observe these cells. With this tool, the lab is able to observe how these cells get infected, the speed at which they get infected, and their overall behavior. This device had 5 different channels or rows, allowing the lab to run cells through each of them. In each of these channels, there are about 12,000 of the chambers pictured on the right. These chambers were designed to capture one cell so that they can be studied in isolation. Essentially, once one of the cells is stuck there, the pressure within the chamber will get super high so that all the other cells will bypass this chamber and go to the next.

Example of single-cell chambers in microfluidic device (Source)
Align and mount the device on microscope
Infection of cells with reporter viruses
A reporter virus is a genetically engineered virus that contains a gene that encodes for a detectable fluorescent marker. These fluorescent markers, usually in a green or red color, can be observed under the microscope and can provide a visual representation of the progression of a virus. All of the cells that are placed in the microfluidic device are infected with this reporter virus. What was interesting is that some of the cells did not get infected, got infected too late or too early. Despite each of these cells having the same genetic makeup, these virology experiments were able to reveal how even in the same cell line, cells can behave differently.
Seeding infected cells into microfluidic device
Now that we have the platform to observe these cells, this step just involves placing them into the device so that they can be observed. This microfluidic device is placed in an incubator when it is not being analyzed in order to maintain the right temperature, humidity, and Co2 levels for the cells.
Image every 30 minutes for 24 hours
The lab can choose if the microscope either takes a bright field (most common) or a fluorescent signal image. With the fluorescent signal image, the greener or reader (in this case green) the cell becomes, the more the virus is replicating.

Examples of successful imaging (Source)
Fluorescent intensity measurement
This step involves graphing the numerous images that were taken over the 24 hour period. Looking at the graph, you can notice that most of these cells experience a huge spike and then die down eventually. This is because some viruses such as poliovirus lyse the cell, meaning that the cell eventually bursts and dies.


Statistical analysis
The final step in this process involves normalizing the fluorescent model from zero to three so that it can be better distributed. This essentially means that they took an average for every time during infection. From this, they were able to get: the start time of infection, point that infection reached its peak, slope of infection, which indicates the speed of viral replication, and finally the duration of the infection. The lab specifically studied two cell lines called HAP1 in its natural form (WT) and Vero E6. The reasoning behind studying the haploid cell line was that they are really unique in that they only have one copy of the genome instead of two. Furthermore, there was also a company that had a knockout of every non-essential gene of HAP-1, giving them a lot of choices to investigate different biological pathways. A gene knockout means to deliberately and permanently deactivate a specific gene's function with the purpose of investigating the function of this gene and its contribution to the development of certain traits or diseases. Thus, instead of the lab having to knock out these genes, they could just order cells that already had this gene deactivated. They also used the Vero cell line because they were monkey kidney cells, and could have some interesting applications. The lab used <a href="https://www.mathworks.com/products/matlab.html"> MATLAB</a> in order to produce these graphs.
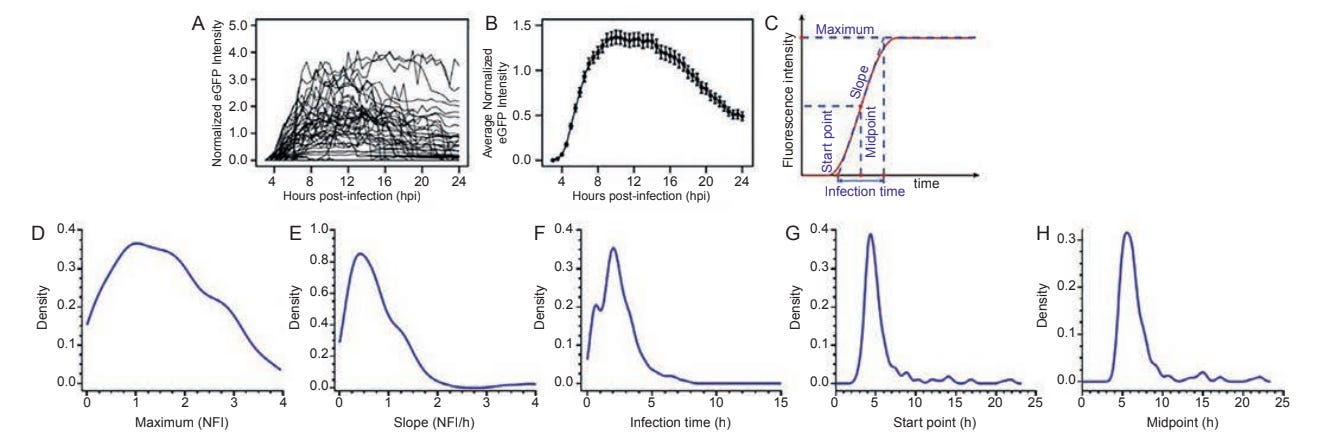
Example of normalization with cell lines (Source)

Challenges
While Ella was able to successfully achieve results, as with any scientific experiment, Ella experienced some challenges during the process:
Design of microfluidic device
Probably the most critical tool for the whole experiment, a lot of time went into ensuring that this device would work and that it could successfully hold the cells. The main issues came from designing the individual chambers because they were so small which made its design and creation rather difficult and costly.
Extracting fluorescent signals from images
Ella mentioned that the process of designing the code was challenging because it had to be able to process thousands of images and produce both the fluorescent intensity graphs and the normalized ones.
Making sure that the entire process ran smoothly
As you can see, this project had a lot of steps that all needed to work in order to efficiently produce accurate results. At its fastest, one cell line took about 2 or 3 days to complete and analyze, meaning that if the lab wanted to run 2 or 3 of these experiments per week, they needed to ensure that each step ran smoothly.
Future
Looking at what is next for Ella, she mentioned that she definitely wanted to explore more of the biological side of biomedical engineering. Cameron lab is particularly interested in sequencing single cells that did not get infected in order to see if their RNA was genetically different in any way that caused them to perform differently.
Advice
During our final minutes of our discussion, Ella shared some invaluable advice that anyone interested in science should listen to.
Ella was specifically adamant about trying as many different fields as possible. This will both expose you to a bunch of different topics that may interest you and eliminate any of those fields that just sound cool. While a field may sound exciting in theory, it can actually be boring once you actually get to a lab and do the required work.
Ella also recommended that people start reading research papers as soon as possible. It is never too early to expose yourself to this type of medium because scientific papers will always remain a critical part of your experience if you choose to pursue anything in science. From reading these papers, you can actually learn a lot just from researching the confusing terms and techniques that appear and then reading about other experiments that are similar.
Of course this sounds easier than it is, scientific papers are a challenging medium and are extremely intimidating. In order to get the most out of them, Ella recommended first reading the overview section to get a general idea of the theme of the paper and if you are even interested in continuing to read it. Then, she recommended glancing at the images and graphs to get a general idea of the overall experiment. Finally, Ella recommended reading the methods and discussion section, which talk about what they did during the experiment and what they learned respectively. The key to understanding these papers is to first get a general feel of the paper before reading word for word. This is because the language can cause you to become flustered and distract from the main purpose of the paper.
Especially if you are still in high school like me, following this advice will give you an incredible skill that will be much needed later in academia and even in the workplace. You will also be far more confident in your field of choice because you have either read about or experienced other fields and have a general idea of what they offer.